jQueryでサムネイル画像付きのスライダーを作成(自作)する

JavaScriptを簡易的に記述できるjQueryでは、便利なメソッドがいろいろ用意されており、手軽にWebページに動きを加えることができます。ただ、Webデザインでよくある複数の画像を切り替えて表示するスライドショーは、jQueryのプラグインを利用することで実装ができますが、プラグインを読み込みすぎると、Webサイトのパフォーマンスに影響してきます。
できればプラグインを利用せずに実装していきたいところ。
jQueryのメソッドを使いこなすことで、スライダーを自作することができます。
ここではプラグインを使わずに、jQueryでサムネイル画像付きのスライダーを作成する方法をご紹介します。
まずは、どのようなメソッドやプロパティを利用していくのか、簡単にご紹介します。
利用するメソッドとプロパティ
ここではいくつかのパターンのスライダーをご紹介していきますが、その中で利用していくメソッドやプロパティをざっと見ていきます。
利用するメソッド
- on()メソッド
- イベントハンドラを指定した要素にアタッチする(今回はclickイベント)
- attr()メソッド
- HTML要素の属性の値を取得、変更、追加、削除する
- addClass()メソッド
- CSSクラスを追加する
- removeClass()メソッド
- CSSクラスを削除する
- hasClass()メソッド
- 指定したクラスをもっているかどうかを判定する
- parents()メソッド
- 先祖要素でセレクタにマッチする要素を取得する
- children()メソッド
- 子要素を取得する
- siblings()メソッド
- 兄弟要素を取得する
- prev()メソッド
- 指定した要素の直前の兄弟要素を取得する
- next()メソッド
- 指定した要素の直後の兄弟要素を取得する
- fadeTo()メソッド
- 指定した要素のフェードイン、フェードアウトの期間と透明度を実装する
- not()メソッド
- マッチした要素から指定したセレクタや条件を満たす要素を除外する
- is()メソッド
- 指定したセレクタと一致する、または指定した関数等の条件を満たしている場合にtrueを返す
利用するプロパティ
- lengthプロパティ
- 文字列の長さや配列の要素数などを取得する
jQueryではよく使われるメソッドから、初めて見る見慣れないメソッドもあるかと思います。
また別のプログラムで利用できるかもしれないので、覚えておくと良いでしょう。
サンプルコードの中で利用していきますので、実際にコードを書いて実装すると少しずつ理解できてきます。
サムネイル画像付きスライダーの作成
それでは、いろんなメソッドを使って、サムネイル画像付きスライダーの作成してみます。
今回ご紹介する方法では、img要素のsrc属性の値を変更して、フェードイン・フェードアウトで画像を切り替えていきます。
以下の5つのパターンでご紹介します。
- src属性を変更する
- src属性とalt属性を変更する
- picture要素 / source要素のsrcset属性とtype属性を変更する
- 自動スライド
- 自動スライド(picture要素対応)
一応、コピペするだけで動くように作っておきました。
サンプルのCSSも載せていきますが、自由に変更してもらってかまいません。
サムネイル画像をクリックしてsrc属性を変更する
まずはHTMLから。
スライダーのブロック「slider-box」を作り、ブロックの中にメインで大きく表示するブロック「main-img」と、サムネイル画像を並べて表示する、ul要素で構築するブロック「thumb-img」という構造にします。
HTML
<div class="slider-box">
  <div class="main-img">
    <img src="images/slider01/slider01-1.jpg" alt="sample01-1">
  </div>
  <ul class="thumb-img">
    <li><img src="images/slider01/slider01-1.jpg" alt="sample01-1"></li>
    <li><img src="images/slider01/slider01-2.jpg" alt="sample01-2"></li>
    <li><img src="images/slider01/slider01-3.jpg" alt="sample01-3"></li>
  </ul>
</div>
img要素の画像パスは、ご自身のサイトのディレクトリ構造に合わせてください。
画像の説明として、alt属性も入れておきましょう。
続いてCSS。
CSSは、この後のスライダーでも共通のスタイルとしていきます。
CSS
* {
  margin: 0;
  padding: 0;
}

img{
  width: 100%;
  height: auto;
}

.slider-box {
  max-width: 960px;
  margin: 2rem auto;
}

.slider-box ul {
  list-style: none;
}

.main-img {
  max-height: 480px;
}

.main-img img {
  max-height: 480px;
  object-fit: cover;
}

.thumb-img {
  display: flex;
  justify-content: center;
}

.thumb-img img {
  max-height: 90px;
  opacity: .6;
  transition: all .6s ease;
}

.thumb-img .view img {
  opacity: 1;
}

.thumb-img .view {
  position: relative;
}

.thumb-img .view::after {
  content: "";
  display: block;
  width: 100%;
  height: 100%;
  border: 3px solid #f00;
  position: absolute;
  top: 0;
  left: 0;
}
サムネイル画像はFlexboxで横並びにして、中央寄せとしています。
サムネイル画像の配置は、ご自身で調整してもOKです。
クラス名「view」が付与された要素には、フォーカスしたように赤色の枠をつけてみます。
クラスの付与は、jQueryで処理していきます。
ここまでの、HTMLとCSSでの実装の表示です。
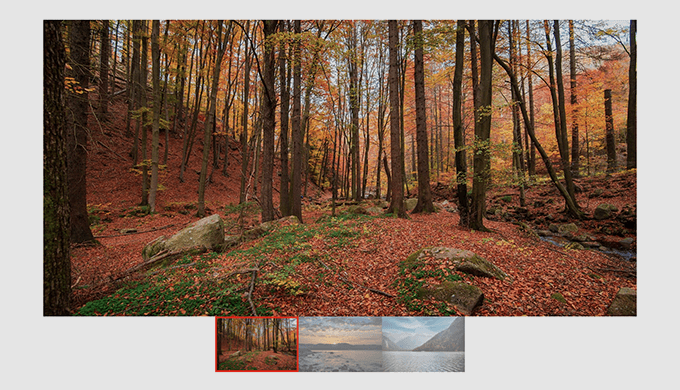
ここから、jQueryでスライダーの動きを実装していきます。
jQuery (src attribute)
$(function(){

  let speed = 500;
  let thumbImg = "thumb-img";
  let img_src;
  $("." + thumbImg + " li:first-child").addClass("view");

  $("." + thumbImg + " li").on("click", function(){
    $(this).addClass("view");
    $(".view").siblings().not(this).removeClass("view");
    img_src = $(this).children('img').attr("src");
    $(this).parents("." + thumbImg).prev().children('img').fadeTo(speed,0.2, function(){
      $(this).attr("src", img_src).fadeTo(speed,1);
    });
  });

});
HTML側で付与するクラスの名前は、自分好みの名前をつけるかと思うので、変数で管理していけるようにしています。
CSSでも、自分の付けたクラス名でデザインを構築してください。
セレクタの指定では「”.” + thumbImg + ” li”」のように、クラス名の入った変数を展開すると扱いやすくなるでしょう。
フェードイン・フェードアウトの切り替わるスピードも手軽に調整できるよう、「speed」という変数を用意して処理していきます。
まずはサムネイル画像の最初の要素には、あらかじめ「view」というクラスを付与しておきます。
その後、onメソッドでサムネイル画像がクリックされた時に、対象のサムネイルにaddClassメソッドで「view」というクラスを付与します。
対象以外の要素については、siblingsメソッドやnotメソッドで対象以外の要素を取得し、removeClassメソッドで「view」というクラスを削除します。
変数「img_src」には、クリックしたサムネイル画像(img要素)のsrc属性を、attrメソッドで取得して格納します。
変数「img_src」の画像パスを、parentsメソッドとprevメソッドで直前のクラスの親要素(main-img)を取得して、childrenメソッドでその子要素(img要素)を取得。これをセレクタとして、fadeToメソッドで要素のフェードイン、フェードアウトの期間と透明度を指定して実装します。
サンプルコードでは、変数「speed」で設定した数値の期間で、透過度を0.2になるようにフェードアウトさせます。その後の関数で同じセレクタに対して、attrメソッドでsrc属性を、変数「img_src」に格納しているサムネイル画像のパスに変更し、またfadeToメソッドを使って、設定した期間の数値で透過度を1としてフェードインさせます。
流れとしては、サムネイル画像をクリックして、サムネイル画像のパスをフェード処理の中で、メイン画像のパスとして変更し、画像を切り替えて表示するといった感じです。
ですが、上記の方法ですとalt属性までは変更されません。
alt属性を設定していくのであれば、一緒に変更していく必要があります。
src属性とalt属性を変更する
次は、src属性とalt属性の両方を変更していきます。
attrメソッドは属性の値の取得や変更ができますので、src属性と同じようにalt属性も取得していきます。
jQuery (src & alt attribute)
$(function(){

  let speed = 500;
  let thumbImg = "thumb-img";
  let img_src, img_alt;
  $("." + thumbImg + " li:first-child").addClass("view");

  $("." + thumbImg + " li").on("click", function(){
    $(this).addClass("view");
    $(".view").siblings().not(this).removeClass("view");
    img_src = $(this).children('img').attr("src");
    img_alt = $(this).children('img').attr("alt");
    $(this).parents("." + thumbImg).prev().children('img').fadeTo(speed,0.2, function(){
      $(this).attr({"src": img_src, "alt": img_alt}).fadeTo(speed,1);
    });
  });

});
変数「img_alt」を追加して、attrメソッドでalt属性を取得します。
fadeToメソッドの処理の中で複数の属性を渡すために、attrメソッドの引数をオブジェクトで渡します。
こうすることで、src属性とalt属性の両方を変更することができます。
picture要素 / source要素のsrcset属性とtype属性を変更する
HTMLでの画像の読み込みは、img要素だけではありません。
Webブラウザごとの画像フォーマットの最適化やレスポンシブ対応など、picture要素で画像を読み込むこともあるでしょう。
picture要素では、source要素のsrcset属性で画像を適応させており、さらにtype属性で画像フォーマットを指定します。ですので、source要素のsrcset属性とtype属性も変更して対応していく必要があります。
まずは、HTMLの構造から
HTML
<div class="slider-box">
  <picture class="main-img">
    <source srcset="images/slider01/slider01-1.webp" type="image/webp"></source>
    <img src="images/slider01/slider01-1.jpg" alt="sample01-1">
  </picture>
  <ul class="thumb-img">
    <li>
      <picture>
        <source srcset="images/slider01/slider01-1.webp" type="image/webp"></source>
        <img src="images/slider01/slider01-1.jpg" alt="sample01-1">
      </picture>
    </li>
    <li>
      <picture>
        <source srcset="images/slider01/slider01-2.jxl" type="image/jxl"></source>
        <img src="images/slider01/slider01-2.jpg" alt="sample01-2">
      </picture>
    </li>
    <li>
      <picture>
        <source srcset="images/slider01/slider01-3.webp" type="image/webp"></source>
        <img src="images/slider01/slider01-3.jpg" alt="sample01-3">
      </picture>
    </li>
  </ul>
</div>
メイン画像のブロックはpicture要素で構築し、サムネイル画像の画像部分もpicture要素で構築します。
img要素には通常の画像を設定し、source要素のsrcset属性には、Webブラウザに最適化するために画像を設定します。
WebP形式の画像で最適化することもあれば、今後は開発が進みつつある、新しい画像フォーマットのJPEG XL(.jxl)などにも対応することもあるでしょう。
いろんなフォーマットで画像最適化する場合、今回ご紹介するスライダーでも利用していけます。
以下、jQueryのプログラムになります。
jQuery (src & alt attribute & picture element)
$(function(){

  let speed = 500;
  let thumbImg = "thumb-img";
  let img_src, img_alt, img_srcset, img_type;
  $("." + thumbImg + " li:first-child").addClass("view");

  $("." + thumbImg + " li").on("click", function(){
    $(this).addClass("view");
    $(".view").siblings().not(this).removeClass("view");
    if($("." + thumbImg + " picture").length) {
      img_src = $(".view").children("picture").children('img').attr("src");
      img_srcset = $(".view").children("picture").children("source").attr("srcset");
      img_type = $(".view").children("picture").children("source").attr("type");
      img_alt = $(".view").children("picture").children('img').attr("alt");
    } else {
      img_src = $(".view").children('img').attr("src");
      img_alt = $(".view").children('img').attr("alt");
    }
    $(this).parents("." + thumbImg).prev().children('img').fadeTo(speed,0.2, function(){
      $(this).attr({"src": img_src, "alt": img_alt}).fadeTo(speed,1);
    });
    $(this).parents("." + thumbImg).prev().children('source').fadeTo(speed,0.2, function(){
      $(this).attr({"srcset": img_srcset, "type": img_type}).fadeTo(speed,1);
    });
  });

});
変数「img_srcset」と「img_type」を追加します。
通常のimg要素のみの場合と、picture要素の場合とどちらにも対応できるように、if文の処理を切り分けています。
if文の条件として、lengthプロパティを使って要素数を確認し、要素があれば変数「img_srcset」と「img_type」にもサムネイル画像のsrcset属性とtype属性を取得して格納します。
フェードの処理は、img要素のみに加えてpicture要素にも対応するように、srcset属性とtype属性の変更を行います。
これで、img要素のみでもpicture要素でもどちらも対応できます。
自動スライド
サムネイル画像をクリックして画像を切り替えるのもいいですが、自動で切り替えるようにもしてみます。
画像を切り替えるタイミングは、setInterval()メソッドを使って設定します。
setIntervalメソッドは、指定した秒数ごとに処理を繰り返し実行するメソッドになります。
まずは、img要素のみ場合。
自動スライドの場合は、サムネイル画像の最後の要素から最初の要素に戻す処理も行わなければならないので、addClassメソッドでクラス名「last」を付与して、最後の要素がわかるようにして処理を行なっていきます。
jQuery(Auto Fade(src & alt attribute))
$(function(){

  let speed = 500;
  let autoplaySpeed = "6000";
  let thumbImg = "thumb-img";

  let img_src, img_alt;
  $("." + thumbImg + " li:first-child").addClass("view");
  $("." + thumbImg + " li:last-child").addClass("last");

  setInterval(function(){
    if($("." + thumbImg + " li.view").hasClass("last")) {
      $("." + thumbImg + " li.view").is(function(){
        $(this).removeClass("view")
        $("." + thumbImg + " li:first-child").addClass("view");
        img_src = $(".view").children("img").attr("src");
        img_alt = $(".view").children("img").attr("alt");
        $(this).parents("." + thumbImg).prev().children('img').fadeTo(speed,0.2, function(){
          $(this).attr({"src": img_src, "alt": img_alt}).fadeTo(speed,1);
        });
      });
    } else {
      $("." + thumbImg + " li.view").is(function(){
        $(this).removeClass("view")
        $(this).next().addClass("view");
        img_src = $(this).next().children("img").attr("src");
        img_alt = $(this).next().children("img").attr("alt");
        $(this).parents("." + thumbImg).prev().children('img').fadeTo(speed,0.2, function(){
          $(this).attr({"src": img_src, "alt": img_alt}).fadeTo(speed,1);
        });
      });
    }
  }, autoplaySpeed);

});
画像パスやalt属性、type属性の取得からフェードの処理、画像パスの変更もこれまで同様、if文の中では、クラス名「last」をもっているかを判別して、isメソッドで指定したセレクタと一致する要素(最後の要素)のクラス名「view」を削除し、最初の要素にクラス名「view」を付与します。
これで、最後の要素の画像の後、また最初の要素に戻って画像が繰り返し自動で切り替わるようになります。
そして、この処理全体をsetIntervalメソッドを使って、変数「autoplaySpeed」で設定したミリ秒の数値のタイミング(サンプルでは6000ms → 6秒)で画像を切り替えます。
自動スライド(picture要素対応)
最後は、自動スライドでpicture要素対応版です。
もちろんimg要素のみでも動作します。
jQuery(Auto Fade(src & alt attribute & picture element))
$(function(){

  let speed = 500;
  let autoplaySpeed = "6000";
  let thumbImg = "thumb-img";

  let img_src, img_alt, img_srcset, img_type;
  $("." + thumbImg + " li:first-child").addClass("view");
  $("." + thumbImg + " li:last-child").addClass("last");

  setInterval(function(){
    if($("." + thumbImg + " li.view").hasClass("last")) {
      $("." + thumbImg + " li.view").is(function(){
        $(this).removeClass("view")
        $("." + thumbImg + " li:first-child").addClass("view");
        if($("." + thumbImg + " picture").length) {
          img_src = $(".view").children("picture").children("img").attr("src");
          img_srcset = $(".view").children("picture").children("source").attr("srcset");
          img_type = $(".view").children("picture").children("source").attr("type");
          img_alt = $(".view").children("picture").children("img").attr("alt");
        } else {
          img_src = $(".view").children("img").attr("src");
          img_alt = $(".view").children("img").attr("alt");
        }
        $(this).parents("." + thumbImg).prev().children('img').fadeTo(speed,0.2, function(){
          $(this).attr({"src": img_src, "alt": img_alt}).fadeTo(speed,1);
        });
        $(this).parents("." + thumbImg).prev().children('source').fadeTo(speed,0.2, function(){
          $(this).attr({"srcset": img_srcset, "type": img_type}).fadeTo(speed,1);
        });
      });
    } else {
      $("." + thumbImg + " li.view").is(function(){
        $(this).removeClass("view")
        $(this).next().addClass("view");
        if($("." + thumbImg + " picture").length) {
          img_src = $(this).next().children("picture").children("img").attr("src");
          img_srcset = $(this).next().children("picture").children("source").attr("srcset");
          img_type = $(this).next().children("picture").children("source").attr("type");
          img_alt = $(this).next().children("picture").children("img").attr("alt");
        } else {
          img_src = $(this).next().children("img").attr("src");
          img_alt = $(this).next().children("img").attr("alt");
        }
        $(this).parents("." + thumbImg).prev().children('img').fadeTo(speed,0.2, function(){
          $(this).attr({"src": img_src, "alt": img_alt}).fadeTo(speed,1);
        });
        $(this).parents("." + thumbImg).prev().children('source').fadeTo(speed,0.2, function(){
          $(this).attr({"srcset": img_srcset, "type": img_type}).fadeTo(speed,1);
        });
      });
    }
  }, autoplaySpeed);

});
先ほどの自動スライドからは、「img_srcset」や「img_type」の変数でpicture要素の情報を取得や、lengthプロパティでのpicture要素の判別等、srcset属性とtype属性の変更処理が追加されるかたちです。
以下、これまでのパターンの実装になります。
まとめ
プラグインは便利ですが、読み込みファイルが多くなっていくと、Webサイトのパフォーマンスにも影響しますので、Webページの動きはなるべく自作できた方がいいです。
jQueryはプログラムが書きやすいですし、便利なメソッドが用意されていますので、ここでご紹介したメソッドやプロパティだけでも覚えておくと、また別の動きを実装したい時に自分で作れるようになっていけると思います。
ここでご紹介したスライダー(フェードスライダー)は、なるべくコピペで使いやすくしていますので、CSSはご自身のWebサイトのデザインに合わせて、必要な時はぜひ参考にしてください。